When you add a new record, you'll want to add it to the Dataset and the underlying database.
Add three new buttons to the form. Set the following properties for your buttons:
Name: btnAddNew
Text: Add New
Name: btnSave
Text: Save
Enabled: False
Name: btnCancel
Text: Cancel
Enabled: False
The Add New button won't actually add a new record. We'll use this button to clear the textboxes, ready for a new record to be added. We can also disable this button after it has been clicked, and enable the Save and Cancel buttons. The Save button is where we'll add the record to the Dataset and to the Database.
Double click your Add New button, and add code to clear the text boxes:
textBox1.Clear();
textBox2.Clear();
textBox3.Clear();
textBox4.Clear();
If the user clicks the Add New button then we want to disable it, and then switch on the Save and Cancel button. To do that, here's the code:
btnAddNew.Enabled = false;
btnSave.Enabled = true;
btnCancel.Enabled = true;
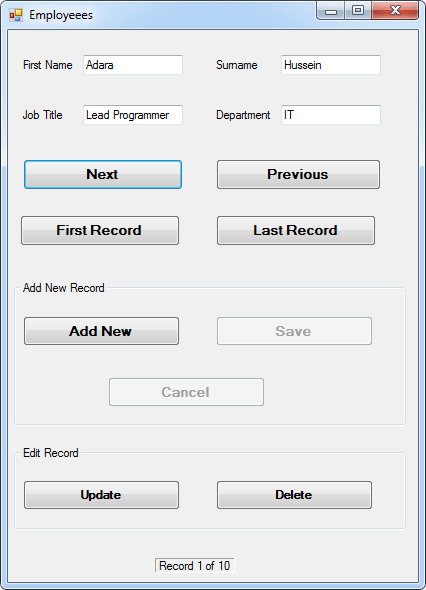
That's all we need to do here. You can test it out, if you want. When the form loads it will look like this (we've put our buttons on a GroupBox):
When you click the Add New button, the form will look like this:
But all the code does is to clear the four textboxes of text. The user can then enter a new record.
Return to Design Time and double click your Cancel button. What we need to do here is to call NavigateRecords. We need to do this because the textboxes are all blank. Calling NavigateRecords will put the record that was erased back into the textboxes.
The Cancel button also needs to reset all three buttons. Here's the code to add, then:
NavigateRecords( );
btnCancel.Enabled = false;
btnSave.Enabled = false;
btnAddNew.Enabled = true;
You can test it out. Click your Add New button when the form loads. The textboxes will go blank, and the first record will disappear. Now click Cancel. You should find that the record reappears.
Saving a New Record
After a new record has been entered into the text boxes, we can save it. Double click your Save button to get at the code.
To save a record, you need to do two things: save it to the Dataset, and save it to the underlying database. You need to do it this way because the Dataset with its copy of the records is disconnected from the database. Saving to the Dataset is NOT the same as saving to the database.
To add a record to the Dataset, you need to create a new Row:
DataRow row = ds.Tables[0].NewRow( );
This creates a new DataRow object that we've called row. The DataRow object is used to add new rows to a Dataset. But the new row will not have any data. To add data to the row, the format is this:
row[1] = textFirstName.Text;
So after your DataRow variable (row) you need a pair of square brackets. In between the square brackets type its position in the Row. This is the Column number. So row[1] refers to the first_name column, for us. After an equals sign, you type whatever it is you want to add to that Column - the text from textFirstName, in our case.
Finally, you issue the Add command:
ds.Tables[0] Rows.Add( row );
After Add, and in between a pair of round brackets, you type the name of the row you want to add, which was row in our example. The new row will then get added to the end of the Dataset.
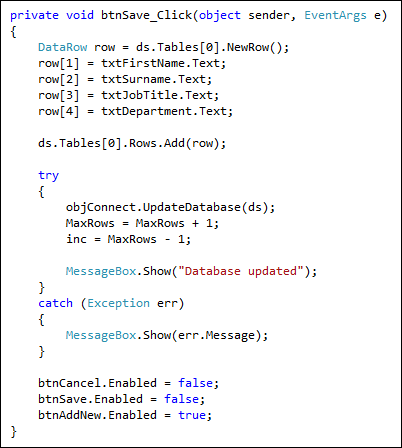
So add this code to your Save button:
DataRow row = ds.Tables[0].NewRow( );
row[1] = txtFirstName.Text;
row[2] = txtSurname.Text;
row[3] = txtJobTitle.Text;
row[4] = txtDepartment.Text;
ds.Tables[0].Rows.Add(row);.Rows.Add(row);
To actually update the database, we need to add a new method to our class. This method will use the DataAdapter we set up. The DataAdapter is linked to the database itself, and can issue Update, Insert and Delete commands. It's quite easy to do and only takes a couple of lines.
If your DatabaseConnections class is not open, double click it in the Solution Explorer to get at the code. Now add the following method:
public void UpdateDatabase( System.Data.DataSet ds )
{
}
So this is a public method that doesn't return a value (void). We called it UpdateDatabase. In between the round brackets of UpdateDatabase have a look at what the code is:
System.Data.DataSet ds
This is a DataSet being passed to the method. The name of the DataSet is ds. Our DataSet, remember, is where all the records are kept, even the ones that have changed. We'll be updating the database with these new changes.
In order to do an automatic update, you need something called a CommandBuilder. This is initialised with the name of a DataAdapter, the DataAdapter we set up earlier in the Class.
Add this rather long line to your method (it should be on one line in your code):
System.Data.SqlClient.SqlCommandBuilder cb = new System.Data.SqlClient.SqlCommandBuilder( da_1 );
We've called our CommandBuilder cb. At the end, in between round brackets, we have the name of our DataAdapter, which was da_1.
Now that we have a CommandBuilder, we can do something with it. Add this line to your method:
cb.DataAdapter.Update( ds.Tables[0] );
The CommandBuilder has a property called DataAdapter. This property has a method of its own called Update. The Update method takes the name of a DataSet and a table. The DataSet for us is ds, which is the one we passed in to our UpdateDatabase method when we set it up. After a dot, you type the name of a table in your dataset.
Here's what your method should look like:
And that's it. That's enough to update the underlying database with your new record. Of course, we have yet to call our new method into action.
Go back to the code for your Save button. Add a try … catch statement:
try
{
}
catch (Exception err)
{
MessageBox.Show(err.Message);
}
For the try part, add the following:
try
{
objConnect.UpdateDatabase(ds);
MaxRows + 1;
inc = MaxRows - 1;
MessageBox.Show("Database updated");
}
As the first line of the try part, we have this:
objConnect.UpdateDatabase(ds);
Here, we access our DatabaseConnections object (objConnect), and call our new method UpdateDatabase. In between the round brackets of our UpdateDatabase method we have the name of our DataSet, which is ds. This contains all the records we pulled from the database, and any amendments we've made. We're handing the whole thing over to the new method, where the CommandBuilder and DataAdapter will take care of the updates for us.
Notice the next two lines:
MaxRows = MaxRows + 1;
inc = MaxRows - 1;
Because we have added a new Row to the Dataset, we also need to add 1 to the MaxRows variable. The inc variable can be set to the last record in the Dataset, which is MaxRows - 1.
The final three lines of our Save code are these:
btnCancel.Enabled = false;
btnSave.Enabled = false;
btnAddNew.Enabled = true;
These three lines just reset the buttons to their original state.
The whole of the code for your Save button should look like this:
Try it out. When you start your programme, click the Add New button to clear the textboxes. Enter a new record in the blank textboxes and then click your Save button. Click your Previous and Next buttons. You'll see that the new record appears. When you close down your project and open it up again, the new record should still be there.
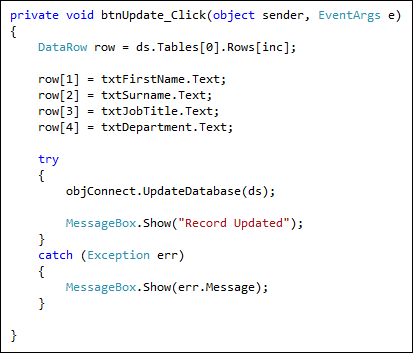
Update a Record
Sometimes, all you want to do is to update a record in the database, change a name, for example, or amend an address.
Add a new button to your form. Call it btnUdate. Double click the button to get at the code. Add the following lines:
DataRow row = ds.Tables[0].Rows[inc];
row[1] = txtFirstName.Text;
row[2] = txtSurname.Text;
row[3] = txtJobTitle.Text;
row[4] = txtDepartment.Text;
This is very similar to the code for adding a new record. Again we start by creating a DataRow object. This time, we place a specific row in the new object. That row is one from the DataSet:
ds.Tables[0].Rows[ inc ];
However, this is the old row. The new details are in the textboxes, the ones you may have amended. To place the new details into the new row object, we simply transfer the textbox date to a position in the row object:
row[1] = txtFirstName.Text;
row[2] = txtSurname.Text;
row[3] = txtJobTitle.Text;
row[4] = txtDepartment.Text;
All we need to do now is to make a call to the UpdateDatabase method from our class. Again, we can do this in a try … catch block:
try
{
objConnect.UpdateDatabase(ds);
MessageBox.Show("Record Updated");
}
catch (Exception err)
{
MessageBox.Show(err.Message);
}
The only line we really need is this one:
objConnect.UpdateDatabase(ds);
This is the same as before: we're just passing our UpdateDatabase method the name of the DataSet, which is called ds.
The whole of the btnUpdate code is this:
Try it out. Run your form and amend one of the records. Click your Update button. When you close the form down and open it back up again, the amended record will display.
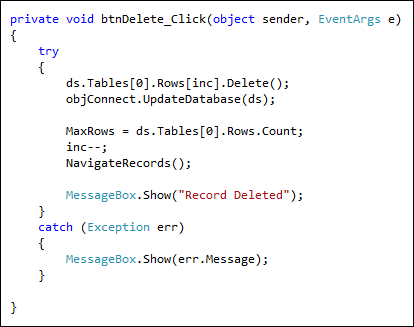
Delete a Record
To delete a record from the Dataset, you use the Delete method on the DataSet:
ds.Tables[0].Rows[inc].Delete( );
This is enough to Delete the entire Row ( Rows[inc] ). But it is only deleted from the Dataset. To delete if from the underlying database as well, we can call our UpdateDatabase method again.
objConnect.UpdateDatabase(ds);
Because a row has been deleted, we need to change the value of our MaxRows variable. We also need to deduct 1 from the inc variable, and make a call NavigateRecords:
MaxRows = ds.Tables[0].Rows.Count;
inc--;
NavigateRecords();
Add another button to your form. Call it btnDelete. Here's the whole of the code to add to your new button:
Try it out. Run your form. Navigate to a record you want to delete, then press your Delete button. Close your form and reopen it. The record you delete should be gone.
Exercise P
Examine this version of our form:
If you look at the bottom, you'll see a label that says Record 1 of 10. Implement this in your own programme. If you set up a method, you can just call it from NavigateRecords.